Simple Adjustment Can Cure Many Problems
You know the feeling—you pull on the handlever to operate the winch, and the
thing just doesn’t move. Immediately, you start wondering about burned clutches
and broken gears.
Before you do anything else, make one very easy check. It might be just
enough to get the winch back in service in a matter of minutes.
Here’s the trick—check the handlever adjustment. It’s amazing how many
problems can be traced back to having the handlever out of adjustment.
Fortunately, it’s easy and quick to set right.
There are several different types of handlevers in use on Allied winches. But
they all share the property that they pivot to move a mechanical push-pull cable
that controls winch operation. Start by checking that the push-pull cable is
securely attached to the handlever. And be sure the handlever pivot is in place
and not broken.
Generally, you want the handlever to be able to move through its entire range
of motion without striking its housing or having its travel hindered in any way.
If it can’t, you need to adjust a nut at the handlever that shortens or
lengthens the control cable to bring the handlever into the correct position.
Check your service manual for the exact details, or contact us for help.
|

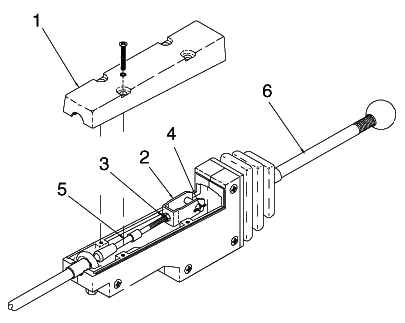
1. Access Cover
2. Clevis
3. Tall Nut
4. Cotter Pin & Link Pin
5. Control Cable
6. Control Lever
7. Screw
8. Jam Nut |
|
There are several handlever designs, but this one is
typical. Adjust the tall nut (item 3) to center the position of the
control lever. |
|
